Showing posts with label Blogger. Show all posts

Thursday, 26 March 2015

How to Use GitHub for Hosting Files?


Google Code is expired now. You can not host any files on Google Code now and in next year on Jan 25, 2016 Google will completely shut down their Google Code Service. This is a bi issue for those using Google Code for hosting their JavaScript, CSS, etc Files even personal project. Next Year, all files that are on Google Code will deleted permanently. Google was also sent an email to all their users regarding this. There are some question that came in our mind, like:
  • What to do Now?
  • How we can save our Files or projects?
  • Where to find similar platform like Google Code?


Well, there are still some places where you can save and host your files. Even better than Google Code. The name of the site GitHub. Maybe many of you know about this site but don't know that how to use it. Well, there a simple tutorial:

How to use GitHub?

#01: Sign in to GitHub or Create account.
#02: Create a new Repository. (By Click on + Icon then New Respository)


#03: Set Repository Name and Description i.e. i set name Design Devta
#04: Make it Public and Tick the Initialize this repository with a README
#05: Select Jekyll for .gitignore


#06: Create repository.
#07: Now Click branch button.
#08: Write new Branch as gh-pages
#09: Then click on Create Branch: gh-pages


#10: Click on Settings from the right side menu
#11: Choose Default Branch as gh-pages


#12: Then Scroll down to Github Pages.


#13: You Successfully Create a Github Page i.e. i created http://hsinghhira.github.io/DesignDevta/
If you click on this URL then it shows error about 404 page not found because we don't upload anything yet.
#14: Now go back to your Repository.


#15: Click on + button to create a new file.


#16: Set File name with file extension i.e. date.js, style.css, etc .js and .css is the file extensions.
#17: Paste File codes in large textarea.


#18: Then scroll down the page to the end. Click on green Commit new file button.
#19: You successfully create a file for hosting.
#20: To get files Hot Link (Direct Link), go to http://github-username.github.io/repository-name/filename i.e. http://hsinghhira.github.io/DesignDevta/date.js
#21: You have created Direct link for your file. Now you can use it for hosting purpose also.


Extra Work (Optional)

As we know, if we go to http://hsinghhira.github.io/DesignDevta/ (Example) then it shows error 404 because there is no file on that link so we will create a index file. Lets go:

#1: Click on + button for Create a new file.
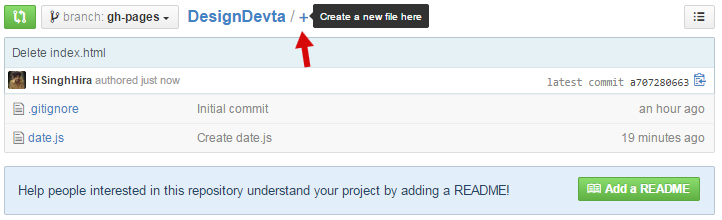

#2: Set File Name as index.html
#3: Paste redirecting codes from below in textarea.


<META content='0;URL=http://your-site-here' http-equiv='refresh'></META>

#4: Replace your-site-here with your site link/URL and Paste it in Textarea.


#5: Click on Commit new file.
#6: Done. Go to: http://github-username.github.io/repository-name 

Now if you go to my repository page (http://hsinghhira.github.io/DesignDevta) then it will redirected to this site.

Thank you for patronizing Design Devta. I am sure your visit to us must be quite satisfying and in line with your expectations from us. Just in case, it's not as you expected from us or if you are facing any problem, kindly forward your feedback's directly to us by leave a Comment below or using our Contact form. And, get assured response from my side. Your feedback's and suggestions are extremely valuable to us. This Post is written by Harman Singh Hira. There is no any source so Copying or using this post for your own site is not allowed. If anyone do so get ready for facing DMCA. Please, if you like this post then share on your social networking sites. Assuring you of our best service always.
Dual whatsapp Happy Diwali SMS Happy Diwali Whatsapp Status, SMS, Messages and Wishes Happy Diwali Shyari in Hindi

Wednesday, 25 March 2015

List of All Blogger Template's Codes


I'm a Blogger Template Designer so i know almost every Blogger Template's Code that need to build a Blogger Template. This list of Codes is very helpful for new Blogger Template Designer. Actually not only for Designers. Sometimes anyone want to show particular thing like comment numbered in his/her site. So this here is the list.

Conditional Tags

To Show something on Home Page only.
<b:if cond='data:blog.url == data:blog.homepageUrl'>
 Codes here
</b:if>

To Hide something from Home Page only.
<b:if cond='data:blog.url != data:blog.homepageUrl'>
 Codes here
</b:if>

To Show something on Post Pages.
<b:if cond='data:blog.pageType == "item"'>
 Codes here
</b:if>

To Hide something from Post Pages
<b:if cond='data:blog.pageType != "item"'>
 Codes here
</b:if>

To Show something on Pages.
<b:if cond='data:blog.pageType == "static_page"'>
Codes here
</b:if>

To Hide Something from Pages.
<b:if cond='data:blog.pageType != "static_page"'>
Codes here
</b:if>


To Show Something on particular URL.
<b:if cond='data:blog.url == "URL of the page"'>
Codes here
</b:if>

To Hide Something from Particular URL.
<b:if cond='data:blog.url != "URL of the page"'>
Codes here
</b:if>

To Show something on Post Pages and Pages.
<b:if cond='data:blog.url == data:post.url'>
Codes here
</b:if>

To Hide something from Post Pages and Pages.
<b:if cond='data:blog.url != data:post.url'>
Codes here
</b:if>

To Show Something on Home Page, Archive Page and Search Page
<b:if cond='data:blog.pageType == "index"'>
Codes here
</b:if>

To Hide Something from Home Page, Archive Page and Search Page
<b:if cond='data:blog.pageType != "index"'>
Codes here
</b:if>

To Show Something on Archive Page only.
<b:if cond='data:blog.pageType == "archive"'>
Codes here
</b:if>

To Hide Something from Archive Page only.
<b:if cond='data:blog.pageType != "archive"'>
Codes here
</b:if>

To Show Something on Error Page.
<b:if cond='data:blog.pageType == "error_page"'>
Codes here
</b:if>

To Hide Something from Error Page
<b:if cond='data:blog.pageType != "error_page"'>
Codes here
</b:if>

To Show Something on Search Page only.
<b:if cond='data:blog.searchLabel'>
Codes here
</b:if>

To Show Something on First Post only.
<b:if cond='data:post.isFirstPost'>
Codes here
</b:if>


Author Codes

Author Name:
 <data:post.author/>
Author Profile URL:
<data:post.authorProfileUrl/>
Author Image:
<data:post.authorPhoto.url/>

Time Stamp
<data:post.timestamp/>

Numbered Comments figure
<data:post.numComments/>

Full Comments Stamp
<b:if cond='data:post.allowComments'>
<b:include data='post' name='comment_count_picker'/>
</b:if>

Label(s)
<b:if cond='data:post.labels'>
<b:loop values='data:post.labels' var='label'>
<a expr:href='data:label.url' rel='tag'><data:label.name/></a><b:if cond='data:label.isLast != &quot;true&quot;'>,</b:if>
</b:loop>
</b:if>

Location
<b:if cond='data:top.showLocation'>
<b:if cond='data:post.location'>
<a expr:href='data:post.location.mapsUrl' target='_blank'><data:post.location.name/></a>
</b:if>
</b:if>

Email me
<b:if cond='data:post.emailPostUrl'>
<a expr:href='data:post.emailPostUrl' expr:title='data:top.emailPostMsg'>
<img alt='' class='icon-action' height='13' src='http://img1.blogblog.com/img/icon18_email.gif' width='18'/>
</a>
</b:if>

Post Edit Pencil Icon
<b:include data='post' name='postQuickEdit'/>

Thank you for patronizing Design Devta. I am sure your visit to us must be quite satisfying and in line with your expectations from us. Just in case, it's not as you expected from us or if you are facing any problem, kindly forward your feedback's directly to us by leave a Comment below or using our Contact form. And, get assured response from my side. Your feedback's and suggestions are extremely valuable to us. Please, if you like our this post then share on your social network. Assuring you of our best service always.

Sunday, 22 March 2015

Index your Post on Google in 3 Second [Trick]


Once you published a New Blog Post then you started waiting for Googlebot to crawl your new post to be indexed in Google. But it took many hours to index and sometimes days. This is also seen that if you have a new Blog and your traffic is not so much then Google do not index your less popular post. Now what to do in this kind of situations? Many other Bloggers give advise to submitting your Blog to Google Webmaster Tools for fast indexing but in reality, this is also not working for Less Traffic Blogs. 


But Now No-More waiting for Indexing. Here a Trick to Index your Post on Google within Seconds. I'm talking about Fetch as Google Tool in Webmaster Tools. Almost every Blogger has an account on Google Webmaster but we never saw it completely. Here I�m explaining about Fetch as Google tool, developed by Google Webmaster tools where you can submit your blog to crawl and indexed very fast. This is 100% working trick and safe. Many other sites posting many tricks to index fast through various ways but that's all tricks are illegal and against Google policies. Use this 100% safe trick.

So let's get Started

First if you do not have account on Google Webmaster Tools then Create new one and add your site to Webmaster tools. Then use below two steps:

Step 1:  Submit your Site's Sitemap.

#1: Go to Webmasters Dashboard and Click on your Site
#2: Then from the left side menu, Click on Crawl then Sitemaps.


#3: Click on Red "ADD/TEST SITEMAP" button.


#4: Enter sitemap.xml in Text field.


#5: Then Click Submit Sitemap.
#6: Refresh the Page. Done.


Step 2: Trick to Index Fast.

#1: Now, Click on Fetch as Google Option from Crawl.


#2: Enter your Post's URL but without Domain name, example below. Enter Red Text only.
http://designdevta.blogspot.com/2015/03/how-to-download-android-apps-in-pc-in.html

#3: Then Click on Fetch Button.
#4: Your URL Fetch properly.
#5: Click on Submit to index Button.


#6: A popup will Appeared. Choose Crawl only site URL Option and Click Go Button.


#7: Done.


Now your Post successfully Index on Google. If you want to check it then go to Google and Search for "site:your-post-link" or click here for example.
Note: You can only Fetch 500 URL in a Month.
Image Courtesy:  Financial Gazette

Thank you for patronizing Design Devta. I am sure your visit to us must be quite satisfying and in line with your expectations from us. Just in case, it's not as you expected from us or if you are facing any problem, kindly forward your feedback's directly to us by leave a Comment below or using our Contact form. And, get assured response from my side. Your feedback's and suggestions are extremely valuable to us. Please, if you like our this post then share on your social network. Assuring you of our best service always.

Monday, 16 March 2015

Add Review Schema in Blogger Templates


I'm hesitant to either use superlatives or make predictions concerning search engine innovations, but the joint announcement by Google, Yahoo and Bing introducing schema.org is, in my opinion, pretty big news.  Schema.org at once provides a mechanism by which semantic web technologies can become a lot more mainstream, and at the same time offers the possibility of superior search visibility for search marketers that embrace this standardized, structured on-page markup.


We all know that Schema SEO used for WordPress is easy. There are lots of plugin for WordPress to improve SEO for Site. But we can't say that Blogger Templates has lack of SEO setting. Almost all premium templates and few free templates too has good SEO setup for better indexing Blogger Blog.

But, there is something that still do have in Blogger Templates reagarding SEO Schema. That is 'Review Schema". If you ever search on Google about IMDB Movie then you must saw the rating stars, votes, etc on Google Search result. 


I added these Schema Review codes in my this Blog and hureee! Google start indexing my posts with review. Check the image below or click here


How to add it on Blogger?

Well, good question. We can't add votes on blogger but atleast we can add Stars, Rating and Reviewed by in Blogger. Here are some simple codes. Add them in Blogger Template above or below <data:post.body/> Tag.

<div style='height:0px;visibility: hidden;'>
<div itemscope='' itemtype='http://data-vocabulary.org/Review'>
<span itemprop='itemreviewed'><data:post.title/></span><br/>
<span itemprop='reviewer'><data:post.author/></span><br/>
<span itemprop='rating'>5</span> of 5
<div itemprop='description'><data:post.snippet/></div>
</div></div>

You can use Google's Structured Data Testing Tool to check my site Review Schema.


I hope this will helps you too. If you have any suggestions then please share with us. This Trick is found by Harman Singh Hira so anyone using the above codes without giving proper credit-back link to me or my site would have to face some legal issue. Therefore, do respect the work.

Thank you for patronizing Design Devta. I am sure your visit to us must be quite satisfying and in line with your expectations from us. Just in case, it's not as you expected from us or if you are facing any problem, kindly forward your feedback's directly to us by leave a Comment below or using our Contact form. And, get assured response from my side. Your feedback's and suggestions are extremely valuable to us. Please, if you like our this post then share on your social network. Assuring you of our best service always.

Saturday, 14 March 2015

Punjab Press Blogger Template v4.1


Punjab Press Template is a well known Blogger Template used by more 10k Users. Template fit for all kind of Blogging Style. Beautiful Eye Catching Responsive Design Compatible with all Ads Sizes. Simple and Understandable Admin Layout Panel. You can change its Color from Orange to any through Template Designer. Template Supported RTL (Right to Left) Support for Urdu, Arabic, etc Languages Sites. Check more Features below:-


Features:
  1. Responsive
  2. Superb SEO Friendly
  3. Simple Admin Layout Panel
  4. Unlimited Colors
  5. Ads Ready
  6. Widgets Ready
  7. Custom Styled Widgets
  8. Lightweight Read More
  9. JSON Search Result
  10. Sitemap and Archive Page
  11. Social Icons
  12. RTL Support
  13. Custom 404 Page
  14. Compatible with Major Browsers 
  15. Neat and Clean Documentation
  16. Forum Support for Buyers
  17. Trusted by 10,000+ Users

Demo and Download


Thank you for patronizing Design Devta. I am sure your visit to us must be quite satisfying and in line with your expectations from us. Just in case, it's not as you expected from us or if you are facing any problem, kindly forward your feedback's directly to us by leave a Comment below or using our Contact form. And, get assured response from my side. Your feedback's and suggestions are extremely valuable to us. Please, if you like our this post then share on your social network. Assuring you of our best service always.

Thursday, 12 March 2015

Google Code Shutting Down Soon

Google Code shutting down on Jan 25, 2016. For Blogger template developers, Google Code is used to host javascript and CSS files. There are almost 70% of Blogger Template that run with the help of Google Code and if Google soon closed this service then many Blogger templates will stop working. Google give us a to export our Google Code work to Github but this is not possible for all. Below is the Email sent be Google regarding my Google Code Projects.
Hello,
Earlier today, Google announced we will be turning down Google Code Project Hosting. The service started in 2006 with the goal of providing a scalable and reliable way of hosting open source projects. Since that time, millions of people have contributed to open source projects hosted on the site.
But a lot has changed since 2006. In the past nine years, many other options for hosting open source projects have popped up, along with vibrant communities of developers. It�s time to recognize that Google Code�s mission to provide open source projects a home has been accomplished by others, such as GitHub and Bitbucket.
We will be shutting down Google Code over the coming months. Starting today, the site will no longer accept new projects, but will remain functionally unchanged until August 2015. After that, project data will be read-only. Early next year, the site will shut down, but project data will be available for download in an archive format.
As the owner of the following projects, you have several options for migrating your data.
  1. Project 1
  2. Project 2
The simplest option would be to use the Google Code Exporter, a new tool that will allow you to export your projects directly to GitHub. Alternatively, we have documentation on how to migrate to other services � GitHub, Bitbucket, and SourceForge � manually.
For more information, please see the Google Open Source blog or contact google-code-shutdown@google.com.
-The Google Code team
Thank you for patronizing Design Devta. I am sure your visit to us must be quite satisfying and in line with your expectations from us. Just in case, it's not as you expected from us or if you are facing any problem, kindly forward your feedback's directly to us by leave a Comment below or using our Contact form. And, get assured response from my side. Your feedback's and suggestions are extremely valuable to us. Please, if you like our this post then share on your social network. Assuring you of our best service always.
website developed and designed by Manthan dudeja .. Powered by Blogger.

Featured Posts

Popular Posts

About Author (Do Not Edit Here!)

Search Bar

Navigation-Menus (Do Not Edit Here!)

Navigation-Menus (Do Not Edit Here!)