Showing posts with label How to. Show all posts

Thursday, 26 March 2015

How to Use GitHub for Hosting Files?


Google Code is expired now. You can not host any files on Google Code now and in next year on Jan 25, 2016 Google will completely shut down their Google Code Service. This is a bi issue for those using Google Code for hosting their JavaScript, CSS, etc Files even personal project. Next Year, all files that are on Google Code will deleted permanently. Google was also sent an email to all their users regarding this. There are some question that came in our mind, like:
  • What to do Now?
  • How we can save our Files or projects?
  • Where to find similar platform like Google Code?


Well, there are still some places where you can save and host your files. Even better than Google Code. The name of the site GitHub. Maybe many of you know about this site but don't know that how to use it. Well, there a simple tutorial:

How to use GitHub?

#01: Sign in to GitHub or Create account.
#02: Create a new Repository. (By Click on + Icon then New Respository)


#03: Set Repository Name and Description i.e. i set name Design Devta
#04: Make it Public and Tick the Initialize this repository with a README
#05: Select Jekyll for .gitignore


#06: Create repository.
#07: Now Click branch button.
#08: Write new Branch as gh-pages
#09: Then click on Create Branch: gh-pages


#10: Click on Settings from the right side menu
#11: Choose Default Branch as gh-pages


#12: Then Scroll down to Github Pages.


#13: You Successfully Create a Github Page i.e. i created http://hsinghhira.github.io/DesignDevta/
If you click on this URL then it shows error about 404 page not found because we don't upload anything yet.
#14: Now go back to your Repository.


#15: Click on + button to create a new file.


#16: Set File name with file extension i.e. date.js, style.css, etc .js and .css is the file extensions.
#17: Paste File codes in large textarea.


#18: Then scroll down the page to the end. Click on green Commit new file button.
#19: You successfully create a file for hosting.
#20: To get files Hot Link (Direct Link), go to http://github-username.github.io/repository-name/filename i.e. http://hsinghhira.github.io/DesignDevta/date.js
#21: You have created Direct link for your file. Now you can use it for hosting purpose also.


Extra Work (Optional)

As we know, if we go to http://hsinghhira.github.io/DesignDevta/ (Example) then it shows error 404 because there is no file on that link so we will create a index file. Lets go:

#1: Click on + button for Create a new file.
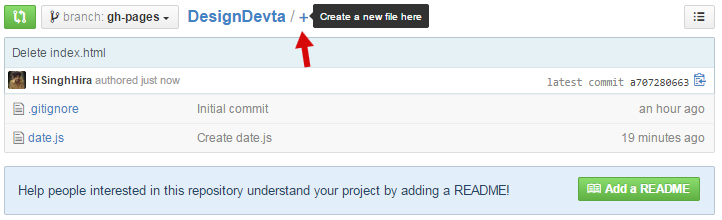

#2: Set File Name as index.html
#3: Paste redirecting codes from below in textarea.


<META content='0;URL=http://your-site-here' http-equiv='refresh'></META>

#4: Replace your-site-here with your site link/URL and Paste it in Textarea.


#5: Click on Commit new file.
#6: Done. Go to: http://github-username.github.io/repository-name 

Now if you go to my repository page (http://hsinghhira.github.io/DesignDevta) then it will redirected to this site.

Thank you for patronizing Design Devta. I am sure your visit to us must be quite satisfying and in line with your expectations from us. Just in case, it's not as you expected from us or if you are facing any problem, kindly forward your feedback's directly to us by leave a Comment below or using our Contact form. And, get assured response from my side. Your feedback's and suggestions are extremely valuable to us. This Post is written by Harman Singh Hira. There is no any source so Copying or using this post for your own site is not allowed. If anyone do so get ready for facing DMCA. Please, if you like this post then share on your social networking sites. Assuring you of our best service always.
Dual whatsapp Happy Diwali SMS Happy Diwali Whatsapp Status, SMS, Messages and Wishes Happy Diwali Shyari in Hindi

Tuesday, 24 March 2015

How to Enable WhatsApp Calling?


WhatsApp Messenger is an instant messaging app for smartphones that operates under a subscription business model. The proprietary, cross-platform app uses the Internet to send text messages, images, video, user location and audio media messages. In January 2015, WhatsApp was the most globally popular messaging app with more than 700 million active users, with India alone having a user base of more than 70 million.


Recently Whatsapp got new feature. That is "Free Whatsapp Calling". Yes, this is true. Now you can call free to your Whatsapp Contacts. WhatsApp calling support both Rooted and Non rooted phones. WhatsApp is rolling out this Calling feature on Invitation Basis. You need to get an Invite from a person who already got this WhatsApp calling feature.

Screenshots


How to Get WhatsApp Calling feature?

You need some requirements to get feature. Read below:
  1. Your Phone Must be Supported by WhatsApp.
  2. You Must have active WhatsApp account.
  3. You must update your WhatsApp application version 2.11.528 or 2.11.531, You can update WhatsApp from Playstore or from Whatsapp Site.
  4. You need an invite from a Person who already have WhatsApp Calling feature active.


It�s possible that WhatsApp may have set a limit to the number of users one could invite or is only allowing a limited set of users at this time to test its networks. So anyone who can make calls, can invite others and spread it.

Comment below that "I need this feature" and Send me your Whatsapp Phone number with your Name and Country Code by hitting below Contact me Button.

Contact me

Thank you for patronizing Design Devta. I am sure your visit to us must be quite satisfying and in line with your expectations from us. Just in case, it's not as you expected from us or if you are facing any problem, kindly forward your feedback's directly to us by leave a Comment below or using our Contact form. And, get assured response from my side. Your feedback's and suggestions are extremely valuable to us. Please, if you like our this post then share on your social network. Assuring you of our best service always.

Monday, 23 March 2015

How to make Instant Notepad in Browser?


A developer or any always looking for new codes or new sites. While browsing sometimes we need an instant temporary notepad to save a link, text or passage. First click on Start Button then Search for Notepad then paste in it; this process seriously very long. There are many Browser's Extensions that work as Notepad but these extension are heavy and can slow down your PC/Mac. My this trick is a Simple Trick. You can make an instant Temporary Notepad within a second with single click. This is Awesome, right? Use this feature anytime by saving it in your Bookmarks and Done.

Better Dark Notepad with Spelling Check

#1: Click here to open in new tab
#2: Drag below icon to your Browser's Bookmark bar.

Notepad

Better Dark Notepad without Spelling Check

#1: Click here to open in new tab
#2: Drag below icon to your Browser's Bookmark bar.

Notepad

Simple Notepad without any Style

#1: Click here to open in new tab
#2: Drag below icon to your Browser's Bookmark bar.

Notepad


Image Courtesy: Free Images Live

Thank you for patronizing Design Devta. I am sure your visit to us must be quite satisfying and in line with your expectations from us. Just in case, it's not as you expected from us or if you are facing any problem, kindly forward your feedback's directly to us by leave a Comment below or using our Contact form. And, get assured response from my side. Your feedback's and suggestions are extremely valuable to us. Please, if you like our this post then share on your social network. Assuring you of our best service always.

Sunday, 22 March 2015

How to Disable Apps Platform on Facebook?


Another post about Facebook. My first post on my this blog about "How to Block App Requests with three methods?" helps many but that post is for particular apps. In my today's post, i will show you that how you can disable your Facebook account for Apps. With this method, you will no more saw any app request in Notification. This is trick is great for those do not use any single app.


On the other hand, there are many disadvantages of this trick. If you use Log in with Facebook on Sites like Spotify, etc then you will no more use this feature. Many Users also added their Twitter and Instagram account their in Facebook. These Users also can't access their Twitter and Instagram through Facebook medium because these applications also work and run through/with Facebook apps and if you disable your Facebook apps then application no more access your account. This Trick only useful for; those uses Facebook for chatting, etc purpose only.

How to Disable Apps?

#1: Log in to Facebook
#2: Click on Settings
#3: Click on Apps Option from left side menu or click here


#4: Click on Edit button for Apps, Websites and Plugins.


#5: A popup will appeared. Then click on Blue Disable Platform Button.


#6: Done

Image Courtesy: Techtudo

Thank you for patronizing Design Devta. I am sure your visit to us must be quite satisfying and in line with your expectations from us. Just in case, it's not as you expected from us or if you are facing any problem, kindly forward your feedback's directly to us by leave a Comment below or using our Contact form. And, get assured response from my side. Your feedback's and suggestions are extremely valuable to us. Please, if you like our this post then share on your social network. Assuring you of our best service always.

Index your Post on Google in 3 Second [Trick]


Once you published a New Blog Post then you started waiting for Googlebot to crawl your new post to be indexed in Google. But it took many hours to index and sometimes days. This is also seen that if you have a new Blog and your traffic is not so much then Google do not index your less popular post. Now what to do in this kind of situations? Many other Bloggers give advise to submitting your Blog to Google Webmaster Tools for fast indexing but in reality, this is also not working for Less Traffic Blogs. 


But Now No-More waiting for Indexing. Here a Trick to Index your Post on Google within Seconds. I'm talking about Fetch as Google Tool in Webmaster Tools. Almost every Blogger has an account on Google Webmaster but we never saw it completely. Here I�m explaining about Fetch as Google tool, developed by Google Webmaster tools where you can submit your blog to crawl and indexed very fast. This is 100% working trick and safe. Many other sites posting many tricks to index fast through various ways but that's all tricks are illegal and against Google policies. Use this 100% safe trick.

So let's get Started

First if you do not have account on Google Webmaster Tools then Create new one and add your site to Webmaster tools. Then use below two steps:

Step 1:  Submit your Site's Sitemap.

#1: Go to Webmasters Dashboard and Click on your Site
#2: Then from the left side menu, Click on Crawl then Sitemaps.


#3: Click on Red "ADD/TEST SITEMAP" button.


#4: Enter sitemap.xml in Text field.


#5: Then Click Submit Sitemap.
#6: Refresh the Page. Done.


Step 2: Trick to Index Fast.

#1: Now, Click on Fetch as Google Option from Crawl.


#2: Enter your Post's URL but without Domain name, example below. Enter Red Text only.
http://designdevta.blogspot.com/2015/03/how-to-download-android-apps-in-pc-in.html

#3: Then Click on Fetch Button.
#4: Your URL Fetch properly.
#5: Click on Submit to index Button.


#6: A popup will Appeared. Choose Crawl only site URL Option and Click Go Button.


#7: Done.


Now your Post successfully Index on Google. If you want to check it then go to Google and Search for "site:your-post-link" or click here for example.
Note: You can only Fetch 500 URL in a Month.
Image Courtesy:  Financial Gazette

Thank you for patronizing Design Devta. I am sure your visit to us must be quite satisfying and in line with your expectations from us. Just in case, it's not as you expected from us or if you are facing any problem, kindly forward your feedback's directly to us by leave a Comment below or using our Contact form. And, get assured response from my side. Your feedback's and suggestions are extremely valuable to us. Please, if you like our this post then share on your social network. Assuring you of our best service always.

Thursday, 19 March 2015

Who Unfriended you on Facebook? Check Now


After my yesterday's Post "How to Disable Facebook Autoplay Video"; i'm back with my new post again about Facebook. Facebook is largest Social Media Network having 100 millions Users around the world. Facebook is the best way to stay connected with our Friends and Family members, and for some 'Unknowns' also. Facebook limit for making friends is 5000. Facebook gives all option to filtering friends by Current City, birthdays, Hometown and many more except Lost Friends. Friends those remove you from their friend list. So here a way to find out.


#1: By Installing Extensions
  1. Install the Extensions for your Browser. For Chrome & For Firefox.
  2. Done. Now it will notify you whenever someone remove you from his/her List.
  3. You can also check this by go to you friend list then click on Lost Friends Option.


#2: Some Online Methods
  1. Who Unfriended me
  2. Sadly Unfriended

Thank you for patronizing Design Devta. I am sure your visit to us must be quite satisfying and in line with your expectations from us. Just in case, it's not as you expected from us or if you are facing any problem, kindly forward your feedback's directly to us by leave a Comment below or using our Contact form. And, get assured response from my side. Your feedback's and suggestions are extremely valuable to us. Please, if you like our this post then share on your social network. Assuring you of our best service always.
website developed and designed by Manthan dudeja .. Powered by Blogger.

Featured Posts

Popular Posts

About Author (Do Not Edit Here!)

Search Bar

Navigation-Menus (Do Not Edit Here!)

Navigation-Menus (Do Not Edit Here!)